
this tutorial was created by
Sharon Becker
on 4th September 2012
It was written for those that have a working
knowlege of PSP
This tutorial was done in PSP X
This tutorial was requested by a friend!
You might find better descriptive tutorials
but this is how I do it myself!
(if you see any others online then,
mine is purely coincidental)
How to run a PSP Script!
First we need your Paintshop Pro X
to know where to find your
Script File & Selections Folders!
Part 1
of *how to run a script*
Step 1.


step 5.
scroll down and find the
*selections* folder
(do not open it tho)
then hit the *ok* button!


step 7.
vHit *File* at top left hand side -

scroll down and find the
*Scripts-Restricted* folder
(do not open it tho)
then hit the *ok* button!


This tutorial was requested by a friend!
You might find better descriptive tutorials
but this is how I do it myself!
(if you see any others online then,
mine is purely coincidental)
How to run a PSP Script!
First we need your Paintshop Pro X
to know where to find your
Script File & Selections Folders!
Part 1
of *how to run a script*
Step 1.
Hit *File* at top left hand side -
then scroll down to *preferences* -
then move mouse across
to *file locations*

step 2.
a box pops up!
on the left side their is a list of names,
please hit *selections* so it is highlighted,
then on the right hand side hit the *add* button

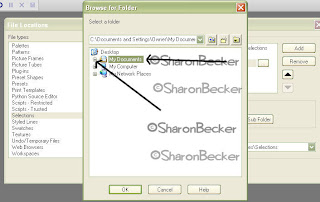
step 3.
another box pops up
highlight the *my documents*
(do not open it tho)
at the left side of the my documents
their is a plus sign
hit that little plus sign!

step 4.
scroll down the list and find & highlight
the *my psp files* folder
(do not open it tho)
as before just hit the little plus sign

scroll down and find the
*selections* folder
(do not open it tho)
then hit the *ok* button!

step 6.
then it will take you to the File Location box again!
Just hit the *ok* button!

vHit *File* at top left hand side -
then scroll down to *preferences* -
then move mouse across
to *file locations*
step 8.
a box pops up!
on the left side their is a list of names,
please hit *Script Restricted* so it is highlighted,
then on the right hand side hit the *add* button

step 9.
another box pops up
highlight the *my documents*
(do not open it tho)
at the left side of the my documents
their is a plus sign
hit that little plus sign!
step 10.
scroll down the list and find & highlight
the *my psp files* folder
(do not open it tho)
as before just hit the little plus sign
step 11.
*Scripts-Restricted* folder
(do not open it tho)
then hit the *ok* button!

step 12.
then it will take you to the File Location box again!
Just hit the *ok* button!
You will only have to do those steps once!
unless you move your *my psp files* folder!
now close your Paintshop Pro X
Now Part 2
of *how to run a script*
(you will do this for every script
you wish to run)
Step 1.
unzip your script,
once unzipped it will look like the screenshot!
double click that folder or right click and hit *open*

step 2.
you will now see the contents of the script folder

step 3.
hit the one that has selections in its name
and right click and hit copy

step 4.
on the left hand side hit
*my documents*

step 5.
then you will see alot of folders in their!
double click the one called
*my psp files*

step 6.
you will now see a lot of folders
look for the one called *selections*
and double click that open

step 7.
find a gap
and *paste* in that folder of selections
you just copied!

step 8.
now repeat steps 2 -5
again but instead of copying the *selections folder*
you will copy the *script file*
then at step 6
you will now see a lot of folders
look for the one called *Script-Restricted*
and double click that open,
find a gap and paste it in their!

Now Part 3
of *how to run a script*
(you will do this for every script
you wish to run)
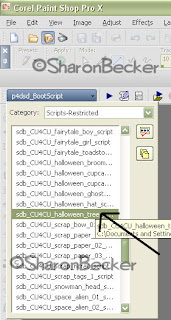
step 1.
open your Paintshop Pro X again
and look for the little arrow
as shown in the screenshot

step 2,
make sure *scripts-restricted*
is at the top of the list!
if it is not, then scroll down the list
hit it to bring up to the top

step 3.
now scroll down your list of scripts and
find the one you want to run!

step 4.
hit the bigger arrow as shown
in the screenshot below
(the No.2 arrow is pointing to it)

step 5.
just follow the instructions that pop up
during the running of your script
along the way!
Note:
you can always find a better place to store
your *my psp files folder*
in case of a computer crash!
BUT remember to re-direct
everything again or the
scripts won't run!
hope this little Tutorial wasn't too
difficult for you!
created by
(c) Sharon Becker
on the 4th September 2012


