Showing posts with label Scrapbooking Tutorials. Show all posts

Tuesday, 4 September 2012

How to run a PSP Script by Sharon Becker


this tutorial was created by
 Sharon Becker
on 4th September 2012

It was written for those that have a working
knowlege of PSP

This tutorial was done in PSP X

This tutorial was requested by a friend!

You might find better descriptive tutorials
but this is how I do it myself!
(if you see any others online then,
 mine is purely coincidental)

How to run a PSP Script!


First we need your Paintshop Pro X
to know where to find your
Script File & Selections Folders!

Part 1 
of *how to run a script*

Step 1.
Hit *File* at top left hand side -
 then scroll down to *preferences* - 
then move mouse across
to *file locations*

step 2.
a box pops up!
on the left side their is a list of names,
please hit *selections* so it is highlighted,
then on the right hand side hit the *add* button

step 3.
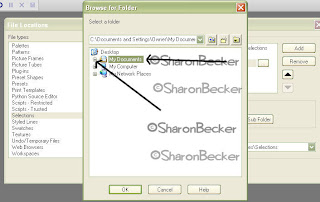
another box pops up
highlight the *my documents*
(do not open it tho)
at the left side of the my documents
their is a plus sign
hit that little plus sign!


step 4.
scroll down the list and find & highlight
the *my psp files* folder
(do not open it tho)
as before just hit the little plus sign

step 5.
scroll down and find the
*selections* folder
(do not open it tho)
then  hit the *ok* button!

step 6.
then it will take you to the File Location box again!
Just hit the *ok* button!

step 7.
vHit *File* at top left hand side -
 then scroll down to *preferences* - 
then move mouse across
to *file locations*

step 8.
a box pops up!
on the left side their is a list of names,
please hit *Script Restricted* so it is highlighted,
then on the right hand side hit the *add* button

step 9.
another box pops up
highlight the *my documents*
(do not open it tho)
at the left side of the my documents
their is a plus sign
hit that little plus sign!

step 10.
scroll down the list and find & highlight
the *my psp files* folder
(do not open it tho)
as before just hit the little plus sign


step 11.
scroll down and find the
*Scripts-Restricted* folder
(do not open it tho)
then  hit the *ok* button!

step 12.
then it will take you to the File Location box again!
Just hit the *ok* button!

You will only have to do those steps once!
unless you move your *my psp files* folder!

now close your Paintshop Pro X

Now Part 2
of  *how to run a script*
(you will do this for every script
you wish to run)

Step 1.
unzip your script,
once unzipped it will look like the screenshot!
double click that folder or right click and hit *open*

step 2.
you will now see the contents of the script folder

step 3.
hit the one that has selections in its name
and right click and hit copy

step 4.
on the left hand side hit
*my documents*


step 5.
then you will see alot of folders in their!
double click the one called 
*my psp files*

step 6.
you will now see a lot of folders
look for the one called *selections*
and double click that open

step 7.
find a gap
and *paste* in that folder of selections
you just copied!

step 8.
now repeat steps 2 -5
again but instead of copying the *selections folder*
you will copy the *script file*
then at step 6
you will now see a lot of folders
look for the one called *Script-Restricted*
and double click that open,
find a gap and paste it in their!


Now Part 3
of  *how to run a script*
(you will do this for every script
you wish to run)

step 1.
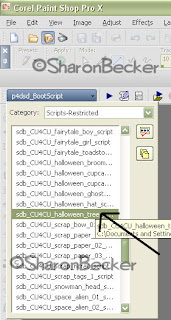
open your Paintshop Pro X again
and look for the little arrow
as shown in the screenshot

step 2,
make sure *scripts-restricted*
is at the top of the list!
if it is not, then scroll down the list
hit it to bring up to the top

step 3.
now scroll down your list of scripts and
find the one you want to run!


step 4.
hit the bigger arrow as shown
in the screenshot below
(the No.2 arrow is pointing to it)

step 5.
just follow the instructions that pop up
during the running of your script
along the way!

Note:
you can always find a better place to store
your *my psp files folder*
in case of a computer crash!
BUT remember to re-direct
 everything again or the
 scripts won't run!

hope this little Tutorial wasn't too
difficult for you!

created by
  (c) Sharon Becker
on the 4th September 2012


Wednesday, 14 July 2010

Making a Tile for Papers

this tutorial was created by Sharon Becker
on 17th february 08
It was written for those that have a working
knowlege of PSP

This tut was done in PSP X

this is how i made the tile,
my ideas, my concepts, any similarities
are purely coincidental,
do not claim as your own.

You will need the following supplies:

Supplies: PaintShopProX and a preset shape

Okay lets start:

1.file - new image - 100x100
or size of choice! this is just for demo purposes!

2.floodfill with main colour of choice

3.then go to your preset shapes, find one you like,
making sure your foreground colour is null,
 and background colour is of choice
then draw out your shape!

make sure you centralize it
by going to ojects - align - centre in canvas
then convert to raster

4.then go to effects - image effects - seamless tiling -
using the settings as shown in screenshot

tiling method: Corner   direction: Bidirectional  settings: horizontal offest 0
vertical offset 2 transition 50  corner style: linear

5.then go to your layer pallette and merge all


6.save how you would normally
(i save mine as JPG into your patterns folder)
7.then to test it out, open another new image of 800x800
or whatever size you require!
go to your background colour click on it and select the pattern
tile you just made and flood fill your new image!

there you have it, your new paper.

Hope you enjoyed my little tutorial!

Created by Sharon Becker

Thursday, 8 July 2010

Photo Prong


This tutorial was created by Sharon Becker
on 11th September 07
for a challenge in
Creative PSP Expressions msn group
(group no longer there anymore)

It was written for those that have a working
knowlege of PSP

This tut was done in PSP X

Supplies needed:
Preset Shape - circle
EyeCandy4000 - glass

This tutorial is fairly easy,

Okay lets start:

File - New - New image
400x300
1.first we need to get the foreground colour to null,
and background colour to grey, like below:


2.next go to your preset shape tool and select the circle,
and draw a circle on the canvas and stretch it outlike this:


3.once happy with the shape DON'T convert to raster YET
..we go to selections - select none, that keeps it still in vector

4.next get your preset shape tool - circle again and draw out a circle
like this:


5.once happy we now convert layer to raster

6.now have the shape right, we get our magic wand
and click inside the grey area like this:


7.while we have the marching ants around it we go to
eyecandy4000 - glass with these settings below


8.then click ok,then go to selections - select none
u have the basic shape now..

9.if you would like to colourise, this is how i do mine..
Adjust - hue & saturation - hue/saturation/lightness
i chose pink with these settings:


There you have it..
merge visible
now save your prong by either exportingas a tube OR
psp format or png whichever suits you.
there you have it..
all done..
Hope you enjoyed my tutorial!!
MyFreeCopyright.com Registered & Protected

Bevel Flower


This tutorial was created by Sharon Becker
on 30th September 07
and was written for those that have a working
knowledge of PSP

This tut was done in PSP X

Supplies needed: HERE
(please don't share these supplies
send them to the tutorial
so they can download supplies themselves,ty)

Embellishment: diamond
Papers: 1 paper
Preset shape: flower 4

all these items are enclosed in the supplies.
i don't know who made them!
if there yours please let me know
and i can delete or give credit
where credit is due!

Plugin Filters: Eyecandy4000 -
glassEyecandy 5 - impact - chrome

This tutorial is fairly easy,

Okay lets start:

Open up supplies put diamond in tubes folder
preset shape into preset shape folder in your
psp programme
paper in your pattern folder!
File - New - New image
600x500
i like to make big then you can
resize to your own taste

1.select preset shape: flower 4

2.click null in your foregroundcolour palette

3.in foreground colour pallette select patterns
and find the pattern you like or one i enclosed
in supplies

4.draw out the shape like this:


6. convert to raster
then go to effects: eyecandy4000 - glass with these settings


click ok(if you haven't eyecandy, you can get the same
effect with effects - inner bevelin your PSP programme)

7.next click selections - select all - selection float - selections defloat
selections - modify - select - selections - borders


then use these settings below


you should have something like this


now with marching ants around it,add new raster layer
and floodfill with grey colour then eyecandy5 -impact - chrome


click ok then selections - select none
(if you haven't eyecandy then just floodfill
with any colour unstead of grey and click
selections - select none)
that's your basic shape
save as psp image so u can use again
on its own if needs be.

8.next duplicate your image image - free rotate - right direction
- 30 degreesthen image resize - 400 (or 67%)
then duplicate that flower andimage - free rotate - right direction
- 30 degreesthen image resize - 400 (or 67%)make sure there
all in the right position

9.add new raster layer find your diamond in psp tubes
and clickin the middle of your flower
merge visible

Resize if prefered
now save your flower as a tube or psp image or png
there you have it..
all done..
Hope you enjoyed my tutorial!!

MyFreeCopyright.com Registered & Protected

Creating a Flower Head


tutorial made by Sharon Becker
on the 20th jan 08

This tut was done in PSP X
this is how i made the item,my ideas, my concepts, any similarities
are purely coincidental,do not claim as your own.

Incase you don't have the Preset shape Teardrop

i have included it Here

before you start the tutorial put it
in your preset shapes first

Lets start:

1.File - New - New image 600x500

2.click on your preset shape tool and look for teardrop
u draw a tear drop with a light background colour and
foreground set at null

3.then selections all - selections float - selections defloat

4.add a new layer with the airbrush set with a dark colour,
make a few marks on the tear drop

5.then add another new layer and do the same but with a light colour


now we go to adjust - blur - gaussian blur set at 8
then go to effects - texture effects - texture
with these settings


merge visible and go to selections none
add a slight drop shadow..


6.now postion ur teardrop towards the bottom of ur canvas
then duplicate it and go to - image - flip
now position the tops of the eardrops so they just about touch
(the pointed ends)
merge visible - then duplicate and image free rotate - 90%
so it now looks like a cross


now duplicate and use the pick tool to rotate and postion how u like


7.then if u want something in the middle
add more flowers by duplicating the merged layer rotate again
and this time resize to taste...
and there u are, ur very own flower...
here is another but in a different colour


Hope you had fun trying out my tutorial

MyFreeCopyright.com Registered & Protected
Related Posts with Thumbnails