Showing posts with label Beginners to PSP. Show all posts

Thursday, 8 July 2010

Creating Text


This tutorial was created by Sharon Becker
on 11th November 07

It was written for beginners of PSP

This tut was done in PSP X

i'm going to show you how to create text
this is how i do it and any similarities
are purely coincidental

Step 1.
Lets choose our colours
i chose white & red


Step 2.
open an new image like
in the screen shots below


step.3
choosing our text and the size of our text
i do mine in vector form so you can stretch it out


this is how it should look now


now while all stetched out like that
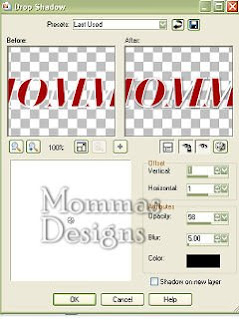
go to effects - 3d effects - drop shadow


using these settings


here we have the finished item


now how i save is:
if you want to save with no background
you go to file - save copy as - find where you want to save
it and save as PNG

if you want to save with white background
then save as JPG
there you have it...
that was quick..
hope you enjoyed my tutorial
wasn't that fun!
Created by Sharon Becker

Adding A Frame


This tutorial was created by Sharon Becker
on 17th November 07

It was written for those that have a working
knowlege of PSP

This tut was done in PSP X

this is how i made the tag,my ideas, my concepts, any similarities
are purely coincidental,do not claim as your own.

You will need the following supplies:
PaintShopProX
and your tag you want to frame

This is a very quick tutorial!

Okay lets start:
step 1
get your finished tag


Step 2 were going to add a frame
click on Image - picture frame


Step 3
choosing a frame
choose one that goes with your tag


Step 4
this is what it looks like when you add the frame


Step 5
merge all (Flattern)


here you have your finished tag


Hope you enjoyed my little tutorial!
Created by Sharon Becker

Adding Bevel to Text


This tutorial was created by Sharon Becker
on 24th November 07
It was written for beginners of PSP

This tut was done in PSP X

i'm going to show you howto create bevel on text
this is how i do it and any similarities are purely coincidental

Step 1. Lets choose our coloursi chose white for
foreground/stroke colourand green for background/fill colour

Step 2.open an new image like
in the screen shots below


step.3 choosing our text and the size of our text
i do mine in vector form so you can stretch it out
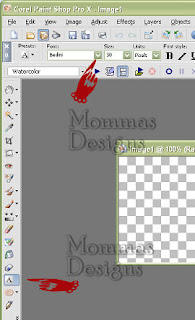


this is how it should look now
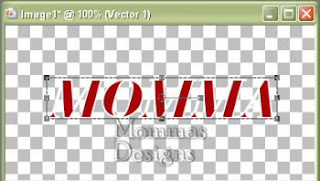


now while all stetched out like that
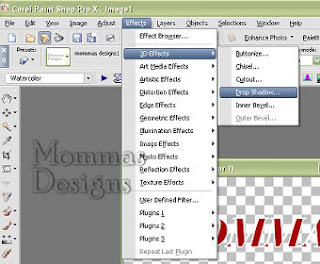
go to effects - 3d effects - drop shadow
this makes it stand out a little


get your magic wand and click
inside each of the letters
so it looks like this


then go to effects - 3d effects - inner bevel


then go to selections - select none
add drop shadow of choice if you want
to make it stand out abit more
then here we have the finished item


now how i save is:
if you want to save with no background
you go to file -
save copy as - find where you want to save it and save as PNG

if you want to save with white background then save as JPG
there you have it...
that was quick..
hope you enjoyed my tutorial
wasn't that fun!

created by Sharon Becker

Adding Noise to Text


This tutorial was created by Sharon Becker
on 26th October 07

It was written for beginners of PSP

This tut was done in PSP X

Supplies needed:

Font: babyblocks

This tutorial is fairly easy,i'm going to show you how i do it
and any similarities arepurely coincidental

Okay lets start:
File - New - New image
400x300

1.first we need to find a fonti used babyblocks,
but any chunky font will do.
mine was set as font size:48 stroke width 2 and set as vector
so u can stretch out if requiredi also chose foreground colour
white & background colour pink


2.now type out ur name like mine below


3.once happy with the shape with size convert to raster
in your layer pallette
4.now get your magic wand:
if you dont no this i have done screen shot below


and use these settings: add shift - matchmode:
RGB values tolerence & feather both set as 0
5.now we click inside each of the letters
of our name on the pink colour, like i have
below


6.now go to Adjust - add/remove noiselike i have below


7.a box pops up, now do the same settings as i have below


8.then click ok,then click selections - none
then i added a drop shadow by going to effects
drop shadow and use a setting if your choice
and this is what mine looked like at this point


9.then on the box that your text is in right click
on the green bar and go to - copy
then open animation shop up and right click on
blank area and paste as new animation
10.go back to psp and undo with the back
button until u have marching ants aroundyour text again
then do the same as in step 7
but instead of 35 in the percentage, change
this to 40, click ok then click selections - none
then i added a drop shadow by going to effects
drop shadow and use a setting if your choice
then on the box that your text is in right click
on the green bar and go to - copy
then back in animation shop and right click on
text you pasted in area last time and paste
after current image
11.go back to psp and undo with the back
button until u have marching ants around
your text again then do the same as in step 7
but instead of 40 in the percentage, changethis to 45,
click ok then click selections - none
then i added a drop shadow by going to effects
drop shadow and use a setting if your choice
then on the box that your text is in right click
on the green bar and go to - copy
then back in animation shop and right click on
text you pasted in area last time and paste
after current image
12.then while in animation shop
look up to the left where it says file
scroll down to *save as* and save into your computer,
and there you are done
if you want to see your animation before you save it
then go to edit - select all
then at the top find *view* then animation
and you should see your text move like glitter
Hope you enjoyed my tutorial!!

PSP X Set Up

PSP X Set Up!
This tutorial was created by Sharon Becker
on 27th October 07

It was written for beginners of PSP

This tut was done in PSP X
i'm going to show you how my PSP is set up

This is a very quick tutorial,lol
open up your PSP X
and this is what it should look like.


see all those tools to the left, i've named them for you!
you will learn as you progress in PSP,what each one is for..

(Sharon Becker aka Momma)
Related Posts with Thumbnails